
A Step-by-Step Guide on How to Install an SSD in Any Laptop
Upgrading your laptop’s storage with a Solid State Drive (SSD) is a cost-effective and efficient way to breathe new life into your device. With faster read and write speeds, improved boot times, and enhanced overall performance, installing an SSD is a worthwhile investment. This step-by-step guide will walk you through the process of how to install an SSD in any laptop, ensuring a smooth and successful upgrade.
Content
Before You Begin To Install an SSD in Any Laptop:
Choose the Right SSD:
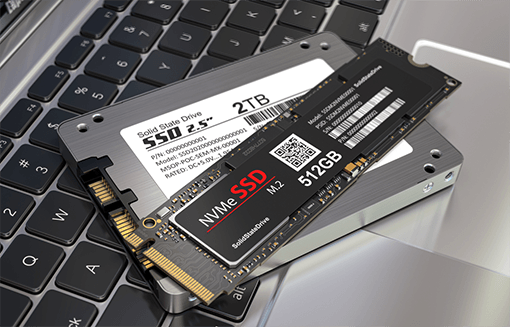
- Before you start the installation process, ensure that you have the correct SSD for your laptop. Check your laptop’s specifications to determine the type and size of the SSD it supports. Common form factors include 2.5-inch SATA, M.2 SATA, and M.2 NVMe.
Backup Your Data:
- Prioritize backing up your data. While the installation process shouldn’t result in data loss, it’s always better to be safe. Use an external hard drive, cloud storage, or any other preferred backup method to safeguard your important files.
Step 1: Gather Necessary Tools and Materials
Before you begin the installation process, gather the following tools and materials:
- Screwdrivers: Depending on your laptop model, you may need a Phillips or Torx screwdriver.
- Anti-static Wrist Strap: To prevent any static electricity damage during the installation.
- External Drive/Cloud Backup: Ensure all important data is backed up.
- User Manual: Have your laptop’s user manual handy for reference.
Step 2: Prepare Your Workspace
Choose a clean, well-lit workspace with ample room to disassemble and reassemble your laptop. Use an anti-static mat or work on a non-static surface to minimize the risk of damaging sensitive components.
Step 3: Power Down and Disconnect
Shut down your laptop and disconnect it from any power source. For added safety, remove the laptop battery if it’s easily accessible. This step ensures that there is no power running through the system during the installation.
Step 4: Identify Access Points
Refer to your laptop’s user manual or online resources to identify the access points for your storage drives. Common locations include the bottom panel or, in some cases, beneath the keyboard.
Step 5: Remove the Old Hard Drive
For laptops with 2.5-inch SATA drives:
- Locate the hard drive compartment.
- Unscrew and remove the panel covering the hard drive.
- Gently disconnect the SATA and power cables from the old hard drive.
- Carefully remove the old hard drive from its bay.
For laptops with M.2 drives:
- Remove the back panel or battery to access the M.2 slot.
- Unscrew and remove the mounting screw securing the M.2 drive.
- Slide out the old M.2 drive from its slot.
Step 6: Install the SSD
For 2.5-inch SATA SSD:
- Insert the new SSD into the drive bay.
- Connect the SATA and power cables to the SSD.
- Secure the SSD in place by tightening the screws.
- Replace the cover panel.
For M.2 SSD:
- Insert the M.2 SSD into the slot at a 30-45 degree angle.
- Secure the SSD in place with the mounting screw.
- Reattach the back panel or battery.
Step 7: Power On and Verify
Power on your laptop and enter the BIOS/UEFI settings to ensure the new SSD is detected. If the SSD is recognized, proceed to reinstalling the operating system.
Step 8: Reinstall the Operating System
Use your operating system’s installation media to reinstall the OS on the new SSD. Follow the on-screen prompts, and select the SSD as the installation destination.
Step 9: Update Drivers and Software
After the operating system is installed, update all drivers and software to ensure optimal performance. Check the laptop manufacturer’s website for the latest drivers and updates.
Step 10: Restore Data
Restore your data from the backup you created earlier. Transfer files from your external drive or download them from your cloud storage.
Conclusion:
By following these step-by-step instructions, you can successfully install an SSD in any laptop, significantly improving its performance and responsiveness. Remember to handle all components with care, follow safety precautions, and consult your laptop’s user manual for specific instructions. With a new SSD in place, your laptop will feel like a brand-new machine, ready to tackle demanding tasks with ease.
FAQs
How do I enable my SSD on my laptop?
Enabling an SSD is typically automatic once installed. Ensure your laptop recognizes it in BIOS/UEFI. If not, check connections or update firmware.
Does SSD make laptop faster?
Yes, significantly. SSDs offer faster read/write speeds, reducing boot times and improving overall system responsiveness compared to traditional HDDs.
Can I add SSD without removing HDD?
Yes, you can. Add an SSD in addition to your existing HDD. Use SSD for the OS and frequently used programs, keeping HDD for extra storage.
How do I install an external SSD in my laptop?
Connect the external SSD via USB. It should be automatically recognized. If not, check device manager for drivers. No internal installation needed.
What’s better SSD or HDD?
SSDs are better for speed, durability, and energy efficiency. HDDs offer more storage at a lower cost. Choose based on your needs; many opt for SSDs for better performance.